Corset competition 2019

I hadn’t really planned on the Foundations Revealed corset competition entering this year. I spent a little too much money and time last year… I didn’t think of it again until mid year when I came across a little sketch on a scrap of paper.

The idea was a corset made of crochet. It was only a seed of an idea, unlikely to be simple and less likely to work. It did seem like it could easily fit into the Architecture theme so perhaps I could give it a go and see how it ended up. The completion offered a nice excuse and I decided to challenge myself in that however it turned out I would submit it.

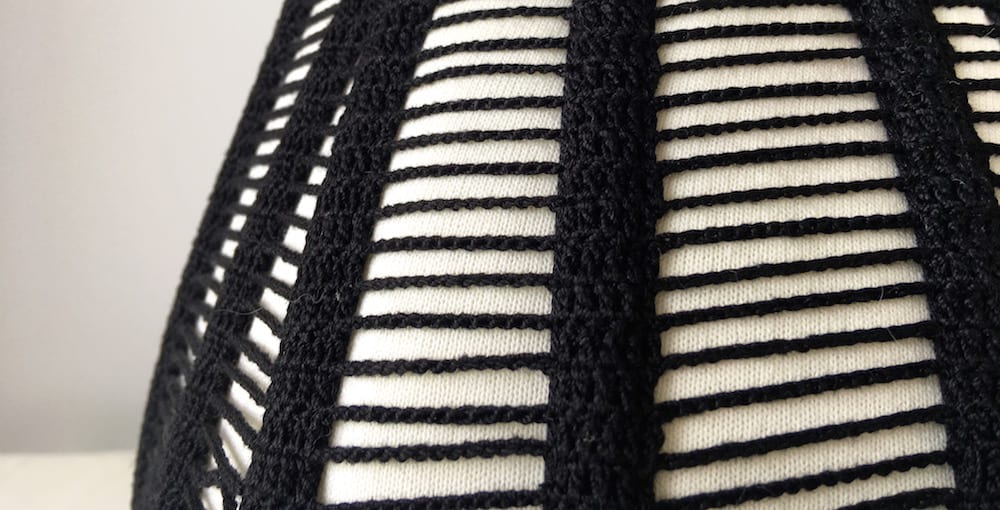
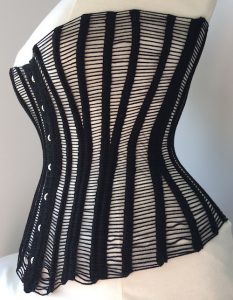
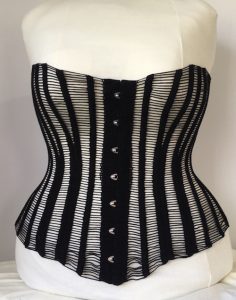
I have always worked in crochet and have a lot of history making complex shapes I understand a fair bit about its capabilities. The chain stitches are actually quite rigid but the double crochet stitch making the channels has a bit of stretch. If the stretchy part of the crochet was put under tension by the boning then the resulting corset should be able to give a good shape.

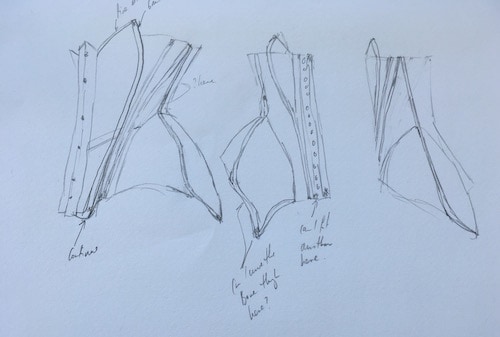
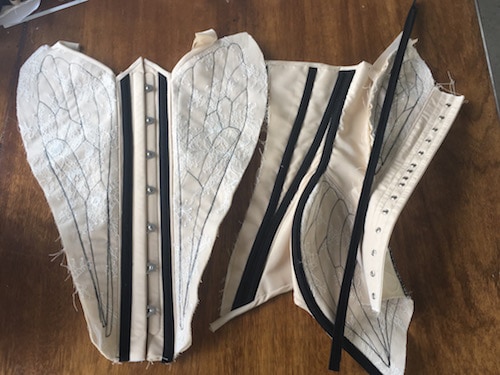
The pattern was one taken from an image in the Symington collection, 1890s ish. Drafted up to my measurements and then made into a toile of cheap canvas and zip ties.

The second test was in Bobbinet, another material I hadn’t used before and wanted to test out. I made a few more adjustments to the pattern after making this version.

Once the pattern was ready I could proceed with the crochet.

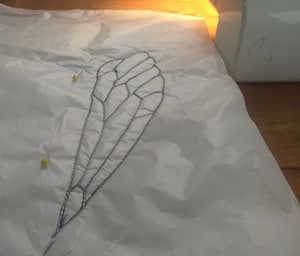
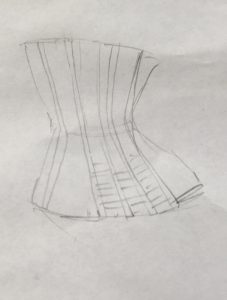
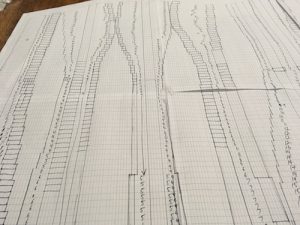
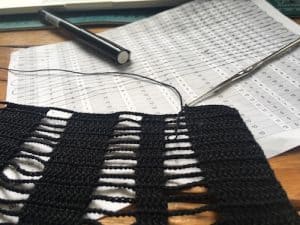
I did some test swatches and decided on my thread and hook. This gave me a stitch gauge which I used to make custom graph paper exactly to scale, printed from excel. I then transferred the pattern pieces onto the graph paper. With a pen and a lot of time I drew each boning channel onto the paper, 5 stitches down the length of the piece where I wanted the channels to be.  The number of stitches between these channels was the count of the chain stitches needed between.

Most rows of crochet went end to end but to create some shaping along the top and bottom edge I used short rows (turn the work over and work back before the end)

Once this was done I realised I didn’t need cumbersome paper to work off, I made another spreadsheet and simply noted the counts. I could then print off 2 copies and cross off the stitches as I did them.

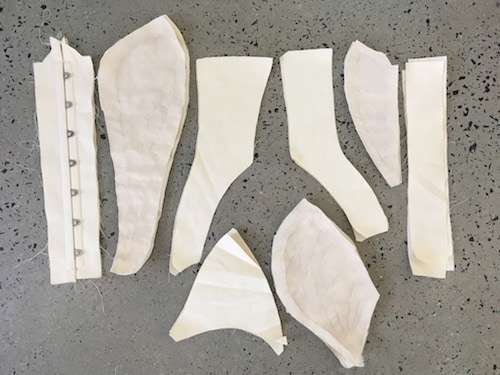
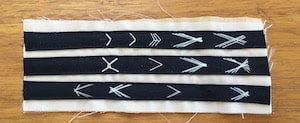
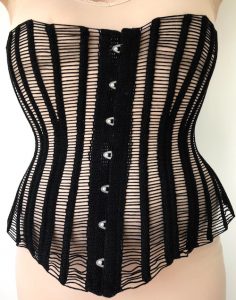
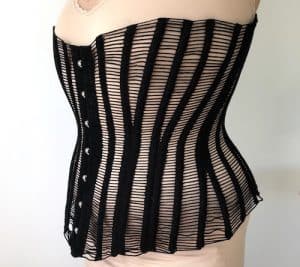
I had toyed with the idea of it would be possible to work the channels in crochet but on my test swatch the coutil channels sewn on looked great and held the crochet rigid. How to get the ends closed was a problem I would wait until the crochet was done to solve.

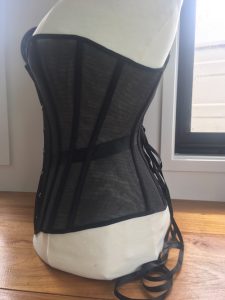
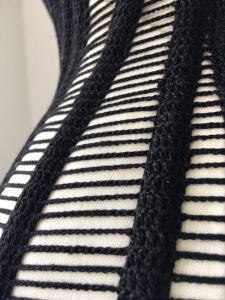
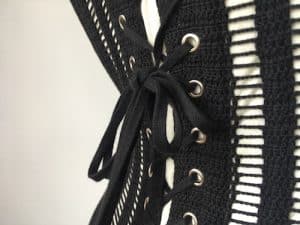
I ended up applying the channels up one side and folded under across the top and down the other side. Leaving the bottom edge open to place the bones and close with my edge stitching foot. The texture of the crochet hid all the detail of the stitching so I could stop and start like that without any change to the outside. The busk is hidden in coutil and sewn on. The eyelets were left as small holes in the crochet but I still backed them with coutil to hold the bones and prevent too much pressure on the crochet alone.

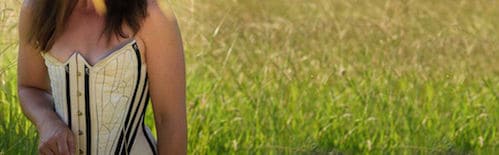
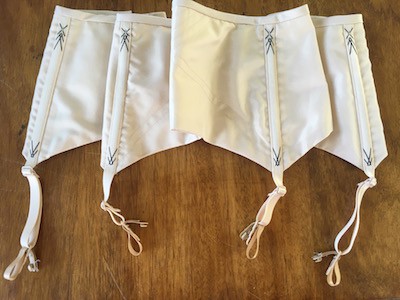
When all was done and I finally had a chance to get the corset on a dress form I realised that the technique worked brilliantly but I had some serious fit issues with the pattern. The bottom edge is too wide so the lines of the stitching are not nice and parallel like the lines around the waist and bust.  Another toile in fabric would have been a good idea to ensure I had made enough reduction around the front bottom edge. I do wonder however if this was in fabric would the same issue be quite so obvious?

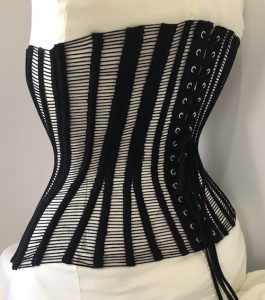
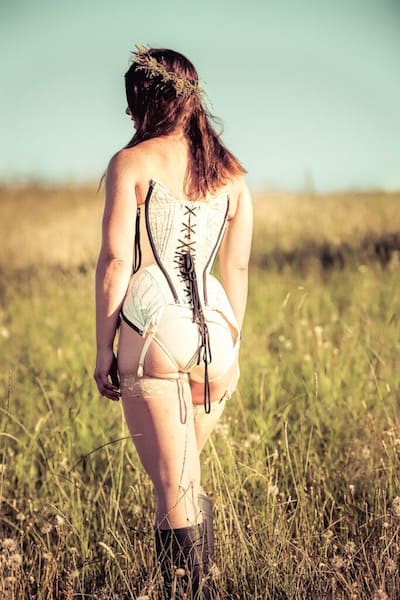
The fit problems were worse when I tried it on myself. It was overall too large and even wider around the bottom edge. My plan to submit whatever the outcome was tempered a little with vanity as I have decided to use the dress form photos for my submission. I will include some of the photos on me below as following links is mostly for friends and fellow makers not the general public.


When I have some time I will try again. A shorter busk and revised bottom edge along with some changed to the top edge. I like the mid bust fit through the front but perhaps don’t need to raise the back as much.


Diary of a corset

The decision to enter the Foundations revealed competition was a big one. Although I am an experienced dressmaker I am still new to corsetry. Here was an opportunity to test myself but could I really cut it against the talented makers who’s work I admired last year?

As is my usual approach to any project I had miltiple ideas swimming around at once. The strongest developed from a photo of an edwardian lady who was very helpfully posed in front of a mirror. I could see all of her corset in the one image. I was struck by the fact I could see the wings of insects already there in the panels. Being new to corsetry I am still exploring the possibilities of the materials, especially the spiral steel boning. I was surprised how flexible it was when I first started to use it. I wondered if I could bend it around lateral curves as part of my design.

The photo below shows one of my latest sketches before I started the pattern.

The pattern began its life as a mould in cling film and masking tape wrapped around my sister. This gave me an exact shape of her body and allowed me to cut the panels where I wanted to. I had in the past made a basic underbust from this pattern so I knew it worked and could be adapted for the wings corset.

The first toile I started made it clear that this idea was going to be more difficult than I had expected. I needed to work out construction methods as I went and the order they needed to be done in was not the usual order for corset construction. The second toile was easier and i used it to finalise boning placement, and the third I finally sorted out the more difficult boning channel construction. A close to final pattern is show below.

My original plan had sheer panels for the 6 pieces which would be wings and I stalled late in the process because of these. Getting the vein embroidery right and making sure the material could handle the stress were questions I didnt want to find the answer to when lacing the finished corset up.

When I joined Foundations revealed  I found not only resources for the kinds of complex corsetry not seen anywhere else but an amazing sense of community and encouragement. It reminded me that my idea was good and that finishing it is important even if it isn’t perfect. I left the sheer fabric behind and instead focused on the construction and was freed from the worry that had stopped my work.

The corset is made of a strength layer of dense herringbone canvas and an outer layer of a pink/beige fabric Ihave no idea the composition of. The wing panels have a layer of cream Chantilly lace to give them some lightness . The boning channels are made from black coutil.

I stuck with the line drawings of the wings as I had planned them for the sheer panels and applied them to the solid fabric. I drew them on kitchen paper and using a continuous line sewed the pattern on the machine in black thread. Embarrassingly I have to admit that one of the jobs I most enjoyed was tweezing the tiny shreds of paper out from between the stitches, it was so satisfying.

The corset still has been hard work but it has been invigorating and inspiring. The steps to put the corset together have been deceptively complicated. Usually bones are added late and edgings are done last but for this design I needed to complete whole sections including boning before I could join it to other sections.

The curved boning channels were cut on the bias and they were hand tacked down both edges before very careful and slow sewing. Below is the corset in construction.

I had always assumed I would floss the corset but when it came time to I wasnt sure how to apporach it. In the end Imade a sample. My concern that the flossing might clutter up an already conplex design waw unfounded. I decided on a small double cross in contrast cotton. I like to use a fine crochet thread for flossing, they are impossible to break.

When all the sewing was completed I arranged a fitting and there were some alterations that were needed. I knew the hip curve might be an issue but I had hoped to be able to pad my model instead of unpicking my corset. Unfortunately it had to be done and I reminded myself that knowing when to undo your work is perhaps one of the most important skills a creative person learns.  (amazing article on how the Edwardians created their shape with padding so it is totally a legit cheat!)

To add some more detail I made a pair of matching suspenders and added a pair of clips to the corset front. Sadly stockings proved difficult to source ( unless Iwanted black or ghastly red ). Although the lace tops look lovely they slightly offend my sense of functionality as the stay ups technically render the clips pointless.

Something this special I decided was worth the investment of a professional photographer. I used a local photographer SK Photography The location is actually where I live in regional NSW. My husband was very happy when I asked him to stop mowing for a little while. Flies are a constand plauge here and I am a little bit sorry I didnt choose the fly as my insect inspiration, my model would have been covered in them. The whole photo shoot went beautifully and I am pleased to have hired a professional for the job. The photos look amazing. I partictularly like the way the gumboots finish off the look ( summer in Australia = snakes)

By the end of it all my fingers look like ballerinas toes and I never want to change the thread colour on my sewing machine ever again. That aside, I am thrilled with the result and cant wait to hear the theme for next year.

Beaded lace bridal hair piece

One great pleasure for anyone who does any sewing is working with amazing fabric. I was lucky enough to be able to work with some exquisite beaded lace which leant itself beautifully to being used for a hair piece.

The way most laces are made mean that they won’t fray so it is possible to clip out the details and use them in creative ways. For this hair piece each layer and petal was wired individually to lift them up and give volume to the finished floral spray.

The image at the top shows the hair piece tucked into a lovely soft up-do.

Below are close ups showing the front and the back. The wire visible from the back as well as the clear comb. I would usually cover the comb base in some silk but in this case the lace was so delicate that the invisible comb was much more subtle.

IMG_6382 IMG_6392

Bow

The bow has yet to recover fully from what the 80’s did to it. The lingering fear of anything with a bow on the back will take a while to shake off. I would like to offer up some beautiful bows to remind everyone of how great they can be.

Vera wang gown with super wide grosgrain bow above.

a4571429c498870c97e95e572b8db2f6 024313a99d5b23e371ff7338578c2829

Vintage draped and tied bows.

a9ccba8c084be99497e4db87bc420380

Large bow incorporated into a sculpted back by Lanvin.

07220db2e72bf4a870cf2ad1f3230646

Chanel dress from the 30’s with contrast bow.

b5fe794c27a5aeec9324bba48ed113b6

Little velvet bows added to a birdcage veil. Perfect for with a sleek and simple dress.

5d4d83f1f7ff28fc0ea7cdeaeae01485-2

Dress covered in bows from Stella McCartney. Would it be too much with the above veil?

f617cfa9f286458f1e555b9794ded4b1 03443a1094b3be1367a8677b113661e6

Here the bows are embroidered onto the dress. An example from the 20’s and a modern take on a 50’s frock.

4cb86a6768e08b19453d3bc62585de09

Sculpted and wired bow by Dior.

cd927339dd567361eb15abc98a03b48a 9baf9341e5efd9aa2d0fcd4b1431ae45

Little bows as detail on the back closure. The left as a detail over a zip and right as the actual closure on an informal dress.

Foundation techniques – Crinoline hem

To create a wonderful curl at the hem of a skirt a woven trim can be used, Sometimes called Crinoline braid or horse hair braid. Originally woven from horse hair this trim has been used as a stiffener throughout victorian fashion. Developed in Synthetic materials it was used for hats in the 20’s and kept the skirts wide in the 50’s. The flexibility comes from the way it is woven in a strip so is technically on the bias, this allows it to be shaped through curls and circle skirts.

The width and weight can be selected depending on the application. Here is an example from the house of adorn.

img_7430

Below shows the braid used to emphasise the curl in a ruffle.

49e6d92d419cbf39c0b8d58ec335abe8

Here and the top image show a heavier version holding the shape in an amazing gown. Zac Posen uses this technique a lot.

1b2febda6a43289c553a449411a4f657

A more subtle example where the braid is used just to add some extra stiffness to a straighter hem. You can see a little line where the top edge of the braid is tacked inside the skirt. Without it this skirt would be falling closer to the legs and the fish tail would not be so exaggerated as it is.

71f63fabf60ad24779c0aad75fdf7697

Here it is left visible as a contrast at the hem. Dior Haute Couture.

463687ba3ec3eb2740b3cdbe42140d1d

A fine strip of crinoline can be used to give the same curl to the edge of a veil.

75ba953a447efc882b6d0abd1ced174c

Silk v Nylon

A little discussion about tulle. The exact weaving technique is what defines tulle but the material it is made from makes it behave as if it was an unrelated fabric.

Silk tulle

Bought back into the spotlight by Katherine middleton and worn perfectly. Silk tulle is made of the same technique as nylon tulle but it looks and feels completly different. It has more drape and inertia than nylon and depending on the quality can look a little more opaque.

Kate shows the way is falls straight down, looking lovely over the face. She also has a wide attachment around the whole front of her tiara. this holds the tulle open so its sheerness can be seen.  A narrow atachment lets the tulle fall straight and none of its transparency  can be seen. I personally think that the kate method is the only way to use silk tulle.

2 veils showing the fall of a silk tulle veil with a narrow base, lady Mary showing how seemingly silk tulle works best with tiaras.

Silk tulle veil  Silk tulle veil silk tulle veil

Nylon Tulle

Normally my fibre snobbery would prevail and I would prefer silk fabric over a synthetic but not when it comes to veils. The threads the fabric is made of are much finer and lighter than silk so the tulle has a lightness and can be incredibly sheer. It also has some stiffness which holds it more open and allows the sheer layers to all be seen. It is also quite inexpensive and available everywhere. I have also seen it in more shades than silk which is usually only white and ivory if you are lucky. Nylon tulles come in white, ivory, The poorly named ‘nude’,champagne and almost caramel (as well as almost all bright colours if you want a coloured veil, I should make a post about coloured veils, against a white dress they are brilliant)

A simple light circle from bhldn (look at the distance from her shoulders the veil is sitting compared to lady Mary), A 60’s bride showing what is possible when you embrace the pouff, A tiny little blusher in an almost invisible whisp of tulle.

Tulle veil bhldn 60's veil   tulle blusher veil


Foundation techniques – boning

In most formal dresses I make there is a need for boning. Boning had a bad name from when it was over and poorly used in the  classic off the shoulder 80’s bridesmaid dress. Here are the types of boning available as well as information on what they do and how I like to use them.

Starting from the subtle through to the serious

Woven plastic – This boning is made of strands of plastic wire woven together into a strip. It is the softest boning available and a wonderful way to keep lines smooth over the body and keep strapless tops from falling down. It is easy to use as you can sew straight through it between the plastic.

plastic – Spotlight/lincraft quality. This quality is great for a wear once only dress. It may have some issues but actually can be removed from its tubes and a fresh piece inserted if you want to wear the dress again.

Plastic – specialist online supplier quality. This boning is made of better quality plastic and also comes in more widths than the  basic quality mentioned. The wider boning is useful for areas where more strength is needed.

When boning is used for cinching in a waist it needs to be good quality. The closure also needs to be considered. A tighter dress will be impossible to close with buttons. If you dont want lacing in the back of the dress I would make a lacing closure inside, this can be pulled tight to fit the dress and then buttons or a zip closes the outer layer over the top. One bride I did this for I could foresee some trouble untying after the wedding champagne so  made sure they had some scissors and used a satin ribbon that could be easily cut and replaced.

 Inside a Valentino dress showing boning in the bodice. This dress also has a tape at the waist and under the bust.

 6ab35182a3548055223f305c527950f6-1

Some time the qualities are mixed and used where they are needed. Harder boning in the centre front and softer against the more flexible sides. Often boning will follow the seam lines and some time I like to use boning on an angle starting on the outside of the breast  going down to meet its twin at the centre front. good to support a fuller bust and flatten a tummy. The lining and boning and outer dress can be joined as one piece or some times the lining and boning is like a little corset, attached only to the dress around the neck line. Below boning used on an angle and the inside of a Christian dior dress showing a lining that closes with hooks and the outer layer of the dress closes over the top

ebb0d8700ae4636774509e92a6837463

694227ea81998849d07d5d453db3376b

Spiral steel – This boning is usually used for corset making. Before using corset boning in a dress I would increase the amount of plastic boning and refine its position. If that wanst going to cut it then spiral steel is the next step. It is made from what looks like a spring of steel that has been flattened and is flexible both front to back and side to side. The curly endes are trimmed and capped with a little clip or rubber dipped so there is a nice smooth top.

d5cf8a56e1608a112c6ed0fc56c74dfe

Solid Steel – I must admit i haven’t used this type of boning myself although I am working on a pattern that will use them so I can test how they work. This kind of boning is only  Flexible only front to back.

A boned corset in all its complicated and flossed glory.

0694d4efd7482657d06d8951297ee94e

The bad reputation of boning I think comes from poor placement, Bones that are too long will dig in under arms and into hips.   Types where the stitching isn’t through the boning need to be secured in place so they dont move up and down inside their channel (this lovely hand stitching seen in corsetry is called flossing and is an art form as well as a technical necessity) Boning quality also matters, if it is a bit weak it will ‘crack’ at the waist when it is bent, This will mean a crease will form in the bone that doesn’t dissapear so will stay pushing into you Craching can also be avoided by using a bone on an angle around curvy areas instead of straight up and down them.


Tulle, you are the queen of ruffles

The final way that tulle excells is by making the most amazing ruffles. No need to hem the edge leaves them light and frothy.

Cute ruffles below and also a lovely sleeve.

dc7e6061cb1ab8b500ebde42f8cc174c

A wonderful technique using the ruffles vertically, narrower at the top edge and fuller at the hem.

c3ece779a22aa5353f62a5aba1ebbe73

Tulle wont hold a permanent pleat like some synthetic fabrics will but they can be put through the machine and will pleat beautifully if you only want to wear them once

51532832ecf7ffbaa629c5fb5ad31bfe

I don’t love the below dress but I do quite like the idea. Ruffles of tulle used between placed lace to give softness and texture. The ruffles on the dress below I think are a little too long but it is still very inspiring.1654bf433d17457883ad4e54a7b93913

This dress is not made of tulle but a skirt of cascading ruffles like this could be made easily. This skirt is so effective because the lines of the ruffles don’t follow the usual direction around the skirt.

575f0558ec56d87541bdd4d7b573a1d2

Simple but effective rows of tulle ruffles on a separate skirt.

64d47949e96cebe06e9b56fa338c61d1-1

The rest of my obsession with tulle here and here


Foundation techniques – waist tape

The internal structure is critical to getting the fit right for a dress. The more formal and complex the outside the same will be true for the inside.

There is a vintage technique I commonly use for formal and wedding dresses and that is adding a waist tape.

the waist tape is a strip of rigid ribbon placed inside the gown at the narrowest point. I love using it for a few reasons. If the dress is tight it will be closed before the zip making it easier to pull the zip (or buttons) up. keeps the dress sitting well and not riding up. It can be raised to around the ribs giving more support for a strapless dress or larger bust.

I have added some images showing the inside of vintage gowns where a waist tape is visible. Before the 1900’s it was used to keep the bodice in place over a corset, gowns were usually made of a top and skirt and the gap between should never be visible. Later it was used to keep the waist of the dress close to the tiny wasp waist in fashion in the 40’s and 50’s.

71c2803106b30853926163f87752c7e6

d2737282096f81345a25512c44ecfdcd


4fbfe44204514dcf4b4f051ebec706c0